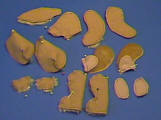
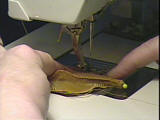
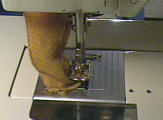
Example page - in my CD all blue words are links to other pages

Sewing

Apart from the really tiny ones, most teddy bears are stitched up by machine. I do assume that you do the same, unless you do not have access to a sewing machine. If you have never worked with one before, it’s easier to learn it than to sew the whole bear by hand. By making bears, my children learned how to work with a sewing machine. It won’t improve the quality if a bear is sewn by hand, and it is very time consuming, as the stitches have to be very short to withstand the stress of stuffing. Even a machine-sewn bear still requires a lot of hand stitching in the making. On the other side, sewing by hand is a very leisurely kind of work, which you can do while watching TV or looking after your children. 

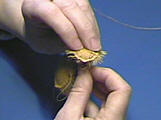
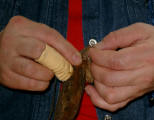
While sewing by hand most bearmakers get problems with little holes in their finger tips , so sometimes you may tell a bearmaker by horny spots. Thimbles can help to avoid hurting the fingers, but only few bearmakers are able to use them. So self made leather thimbles can be helpful.

There’s no rule with which part to start sewing. Usually, you’ve got to pin the pieces together first, depending on how slippery the fabric is. 

Sewing the head, the neck seam is closed first. It’s advisable to baste in the gusset first so it won’t slip away and the head turns out symmetrically.
Another way is also used by many bearmakers (me included) you first sew on both head sides to the gusset and then close the seam for the chin.

For the soles of the feet, it’s the same: Baste them in by hand, then sew by machine. I insert the soles with the leg standing upright, the sole thus pointing down. 
 

If you are making very small bears, insert the soles all by hand. I then don’t use the backstitch, but a double basting stitch, i.e. I baste all around the sole, then go for a second lap, closing the gaps of the first one.
In case the ears are very small and could slip when sewing, you can fold your fabric right sides together, draw and sew the ears, then cut them. I also use this method when sewing rather small bears by machine.

Pictures taken from an online class by Manuelea Zöhrer demonstrate first sewing and then cutting the ears.

For all kinds of bears, it is advisable to sew up the bottom of the ears with a zigzag stitch after turning them inside out. Then, they’re easier to sew to the head. Never stuff the ears!

More elegant is the way Manuela Zöhrer does the ears:
as shown in her photographs above she does some stitches at the bottom of the ears. The picture on right shows, how tidy an ear looks this way.

drawings Manuela Zöhrer

Before you turn the finished parts right side out, look at the backside of your seams. Sometimes the fabric slips, with gaps remaining. These mistakes are easily removed by sewing a second time, back side up. Only if the discrepancy is very significant, have you got to undo the seam. By the way, an ordinary straight stitch will do. Unlike stuffed dolls, teddies must not be sewn with a zigzag stitch.

Mind not to close the feet by mistake!
Don’t forget to leave open gaps when sewing arms, legs and back. You’ll need at least as much space as the size of the disk to  insert it.

Maybe someone has told you a ‘great trick’: To sew all around the arms and legs, then slit the fabric where the disk is going to be, then turn the piece and stuff through that slit (fig. left). This method was used for years by several teddy bear companies, because it’s faster and the arms and legs bear no visible hand seams. This results in many teddies losing their limbs. Each movement of the joint strains the hand seams with which the slit is finally closed after inserting the disk and cotter pin. Frequently the seam will open, the slit elongate, and suddenly a handshake with Teddy ends up with you shaking the whole arm, which fell off.

This bear is only one of many teddies I had in surgery because of this method.
To repair it, you’ll have to open the body – otherwise, you couldn’t reach the joints. I had to do this operation so often that I can only tell you to stay away from tricks like this. Anyway, you’ll have to sew up the back by hand, so you’ve got to learn the essential ladder stitch in any case.
The arms are mostly closed on the backside (fig. right). With the legs, this depends on the pattern. If the leg was placed on a fold and cut in one piece, the seam is on the front, of course, otherwise rather on the back.